

I work with OS deployment and I also work with our own LAB environment that in combination means that I build task sequences for our own labs. These labs really tends to consume space, we are talking in numbers of GB, close to 200 GB for one LAB. The problem is not really the space the data consume, it is more the time it takes to copy the stuff, so far we do this mostly in the evening or in the night. So, how can we get rid of data we don’t need?
Start using Reference disk and Differencing disk:
To be able to create VM’s really fast we can’t really wait until the installation is done the “normal” way, which just takes too long time, which is way we use a reference image. A Reference image is just plain vanilla windows installed and maybe some “Windows Update” in the end to have the image updated with patches and some settings. A Difference disk is also an easy understanding, it is just a disk that behaves like a “read from me source, but write to this child disk instead”. From a Hyper-V standpoint, it cannot see the difference at all. The effect will be less space, since most of the servers in a lab situation are running the same OS anyway… Let’s look at one example
That means that if we install 4 servers, we build these based on a one differencing disk. The base disk will consume around 8 GB in size and the 4 unique disks per VM will then consume the difference from the base disk, and that will be approximately 2 GB. So my 4 VM’s will be 8( The base Image)+2+2+2+2(2 for additional unique data) = 16 GB instead of 8+2*4 = 40GB. The bigger LAB I have the more do I save. To be able to use a differencing disk you first need to create one.
Create a reference image:
You can create one using various methods but here is what I use
- Use Microsoft Deployment Toolkit to create a Ref Image using LiteTouch
- Use WIM2VHD to create a Ref Image
Create VM’s using Differencing Disk:
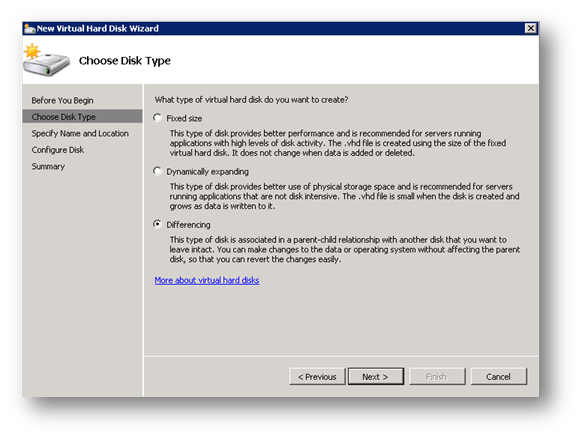
It is not that hard, you just create a new VM, but when it comes to create a disk you just pick “later”

“Later”, meaning when the machine is created (without any hard disk), you open up settings
- Browse to IDE Controller 0
- Select Hard Drive and click Add
- Select New
- Select Differencing
Here is where you select where to create the disk

And here is where you select on what vhd this difference vhd should be based on

The BIG problem
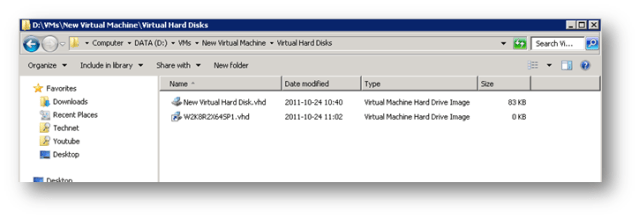
Well so far everything is nice and friendly, but what happens if you export those VMs so you can import them on another machine, well this is what happens. Hyper-V will export all resources and create an import XML file so we can import that VM’s somewhere else and that is almost what I want, I don’t need the reference disk, but that is going to be copied anyway. Also a small note, the export function also modifies the path to the parent differencing disk to be located in the same folder the child difference disk is stored. To make this simple to understand, as soon as you export the machines, all the space savings are lost since every VM also copies the parent differencing disk to the export folder
It looks like this after an export:

So now it will take the same disk space when you import the VM’s and this is sad…
The TINY fix – mklink.exe
So one easy way to fix this is to before we import them, just keep one copy of the difference parent disk, and them copy the disk to each and every location, but that would not really save space at the destination, only in transit and that’s not good enough. No, the fix is to use “links” in the file system, something that has been around in NTFS for some years now. So the basic steps is going to be
- Create Ref
- Use ref as Parent Difference Disk
- Export VM’s
- Create one folder in the export folder
- Store all differencing parent disk in that folder
- Remove All copies of those files in the export folders subfolders
- Export done
To import them somewhere else:
- Copy the content of the Export folder to the location where the VMs are going to run
- Recreate the missing differencing disk using “mklink.exe” and point hem to the location where they are now
- Import the machines
- Use them
Here is the command for mklink.exe:
Mklink.exe “d:\VMs\New Virtual Machine\Virtual Hard Disks\W2K8R2X64SP1.vhd” “c:\Ref\W2K8R2X64SP1.vhd”
This will create a link from the location the Hyper-V believes that disk should be to the location where it actually is located
(Yes I know, you should not lie, but sometimes a lie can really make life a bit easier…)
So from a file system perspective it looks like this when I open the imported folder
As you can see my difference/reference disk in this case is just a link to the real object, but hyper-V thinks it is a working disk and will use it.
/mike
Sample SCRIPT
Yeah, I know it should be PowerShell, VB or something really cool, but… Anyway here is a sample batch file that will import two VM’s that have been exported and then modified so that the difference disk is located in the RefDisk folder: You can download this here (including the vbscript that imports VM’s)
REM SET StuffSET SOURCE=E:\labfiles\LABXSET DEST=D:\LABREM Set working dirCD /D %SOURCE%REM Copy FilesRoboCopy %SOURCE%\source %DEST% /sREM Link VHDmklink "%DEST%\DEMO-DC01\Virtual Hard Disks\W2K8R2X64SP1.vhd" "%DEST%\RefDisk\W2K8R2X64SP1.vhd"mklink "%DEST%\DEMO-DC02\Virtual Hard Disks\W2K8R2X64SP1.vhd" "%DEST%\RefDisk\W2K8R2X64SP1.vhd"REM Import VM'scscript importvms.vbs %DEST%\DEMO-DC01 DEMO-DC01cscript importvms.vbs %DEST%\DEMO-DC02 DEMO-DC02
Share this:

Categories: Uncategorized


Great article, thanks Micke!
LikeLike
Really useful stuff, thanks Mike!
LikeLike